Posted on Leave a comment

Hinterland Ho Hum

Looking for the pattern library? Click here Announcing the Pattern Library

on with the review of Sew Liberated’s Hinterland Dress in extended sizes…

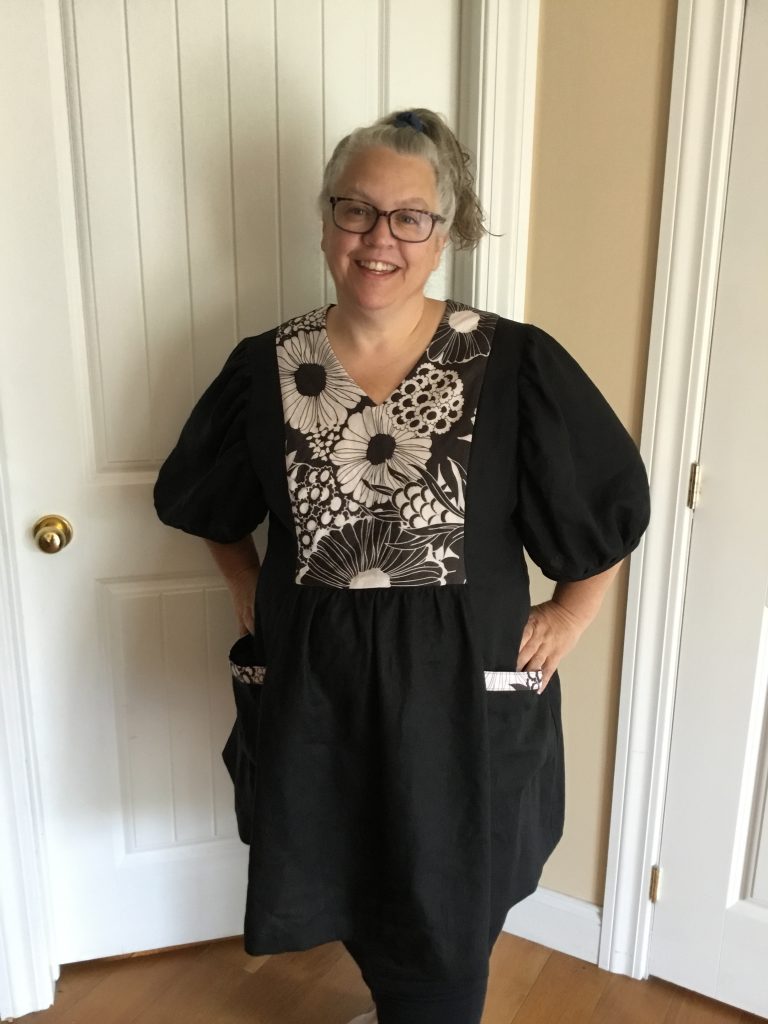
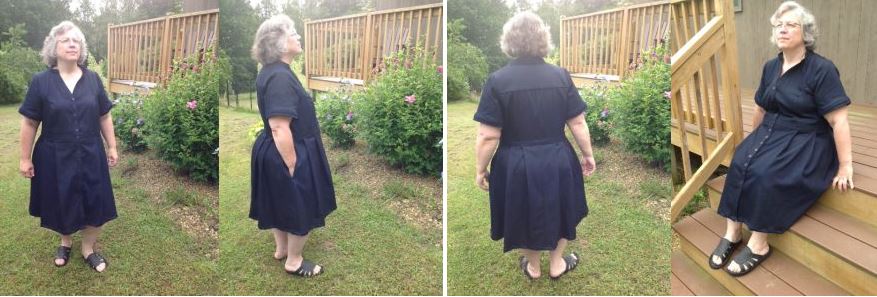
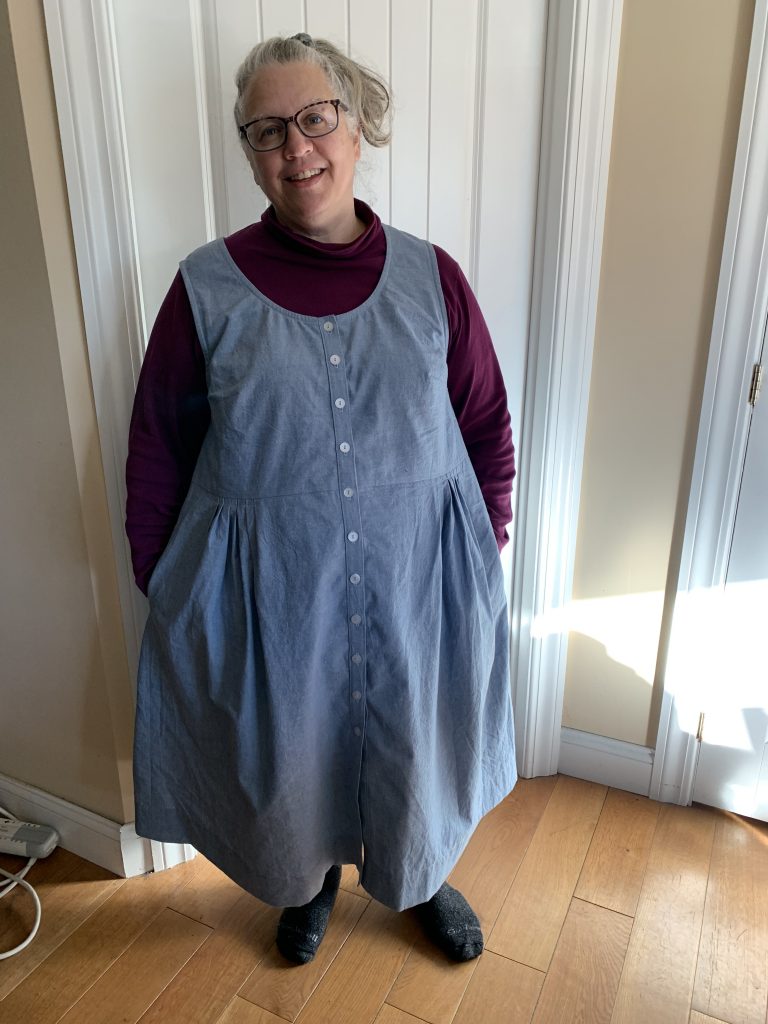
Years ago I fell in love with Sew Liberated’s Hinterland dress. It did not even come close to my measurements, but I purchased it anyway, vowing to grade it out. I never did, and recently revisited it and discovered it was being offered in extended sizes. I traced out the pattern grading from size 22 bust to 30 waist to 32 hips. I pinned the pieces on my dress form, and immediately saw that the shoulders were off, and the bust dart needed to be moved. I also recognized that my large arm bicep would require a larger sleeve, so I used a size 28 sleeve and drew the size 28 armscye onto my size 22 bodice. Undaunted, I continued to make my long awaited Hinterland dress.

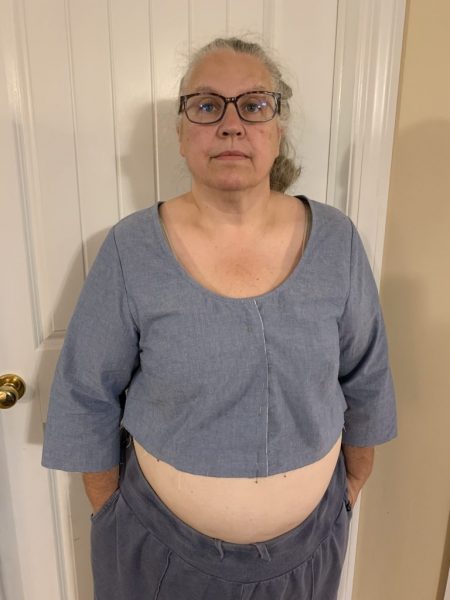
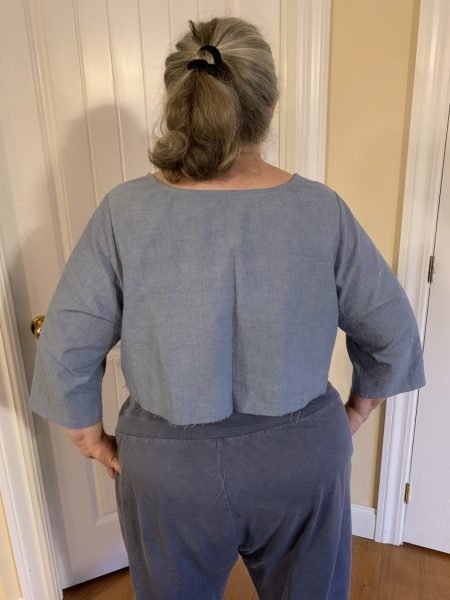
My first major mistake was to cut into some of my favorite chambray. Sewing up the bodice went smoothly. The bust dart landed in the right place, and the shoulders were sitting as expected. The first noticeable problem was the neckline was low. Way too low for me to wear without something underneath it. Okay, not the end of the world. I sewed the sleeves on, and the second wave of disappointment hit, with the sleeves, I felt like I was in straight jacket. It looked perfect if I was still, but felt confining across back and arms when I moved, and yet at the same time the front bodice seemed loose. The neckline was both too wide and too low. The back of the neck fell away from my upper back. Problems I have not really encountered on other makes. 

Keeping an open mind, I cut the skirt, the full width of fabric adding inches to allow more gathering. Even with added width the gathering was not sufficient. Photos of smaller sizes had plenty of gathers, so I am left to wonder why so little gathering on my size.  I managed to add the full length button plackets, but I found the instructions or placket width lacking as I struggled to squeeze on these plackets. Another mistake was forgetting to account for front placket width. That extra inch made the front bodice look even looser and sloppy.  At this point, about the only thing I liked about the garment were the pockets. A big let down after coveting this dress for years. The fabric had been a favorite and I used what was left to make the dress, which I knew would not be worn as is.

So what went wrong… I suspect at least some of the problem lies in the grading process. As folks get larger, their necklines do not expand proportionately. The back should be yoked, and gathered or pleated. As a pear or triangle shaped person, perhaps this style was not a great choice, as it minimizes my already small top, and maximizes my ample bottom. Neither flattering, or comfortable. 

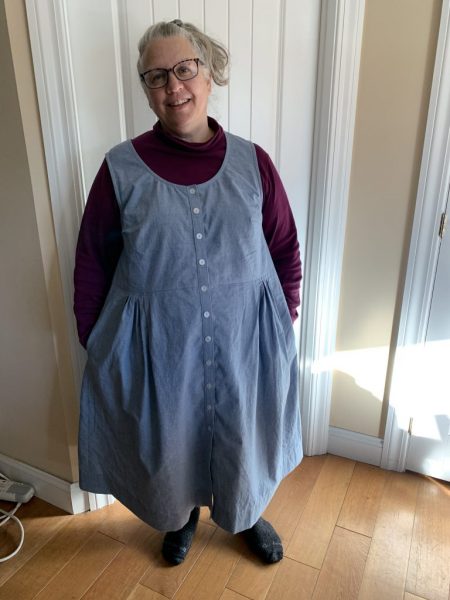
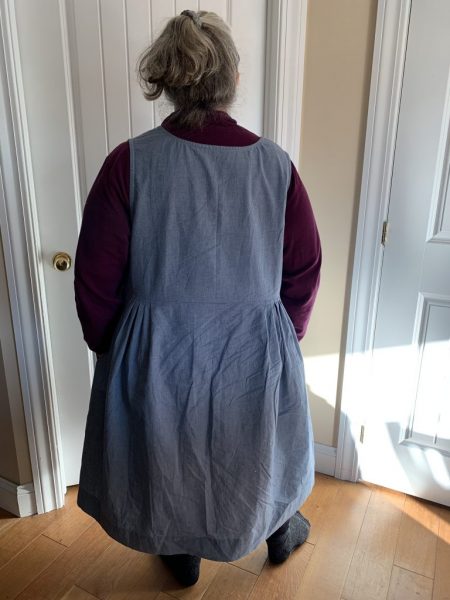
In an effort to reclaim the beloved chambray, I removed the sleeves. I finished arm holes with bias binding. This added comfort but the large arm holes meant an undershirt would be needed. I reworked the gathers into a series of grouped pleats. It looked a bit neater, and moved extra roominess where I needed it the most. Now, I had a comfortable and wearable garment. I was hopeful, that it would be a good layering piece, but I am not convinced. Realistically it will probably be a great work apron but not much more.

I must end by saying that I do love Sew Liberated’s designs. I made their Estuary skirt. It came out exactly as I had hoped, and yet it does not get worn. I have a significantly tilted waist, which the elastic waistband slips into leaving the skirt hem wildly out of alignment. To correct, I could alter the hem, but the difference in length between front and back would be very noticeable. So again, that was not a great choice for my body. I am thinking of putting suspenders on the skirt to see if that would help. In the meantime, I vow to take my specific body shape into consideration when choosing patterns in the future. 

Posted on Leave a comment

Announcing the Pattern Library

The Just Cut the Scrap Pattern Library is now available.  This FREE library contains a list of patterns that is searchable by  type of fabric, type of garment, skill level, your measurements, and more. The advanced search allows you to combine search requirements to help you narrow in on the patterns you are looking for.

The patterns themselves are NOT available for sale or download here, but you can purchase them from their original publishers.  I am not affiliated with any pattern companies. The data is compiled to the best of my ability, but is not guaranteed. Always refer to the pattern company web site when in doubt.  I’ll be adding patterns regularly to the library!

Visit the Just Cut the Scrap Pattern Library

Feedback and requests are appreciated, please click here to email me.


Posted on 2 Comments

Mashup of Itch to Stitch’s Celeste Dress and Anna Allen’s Anthea Top

Original Itch to Stitch Celeste in Extended Sizes


Back of Itch to Stitch Celeste Dress in Extended Sizes


I was fortunate to be selected as a pattern tester for Itch to Stitch Celeste Dress pattern in extended sizes. My measurements as of testing were 48 bust, C cup, 49 waist, and 59 hips. I started with a D cup size 18, graded to size 30 waist, and size 34 hip. My bust fell in middle of range, in the end rounding down to C cup resulted in even better fit. First thing to mention is this is one of the best  results I have gotten while grading a dress. My measurements require pretty significant grading, and after grading, this dress went together like it was out of the envelope. The princess seams were spot on. There was no shoulder adjustment needed as well. I did struggle a bit with a full bicep adjustment on the sleeve. My final make was done in a linen blend. Being 5’4” I shortened the pattern to match the designer’s intended length. I also added 3/4” to the bodice along the recommended line. The pockets are amazing. It is a great summer dress with just the right amount of sass. Normally I would drop the arm scye to accommodate a larger sleeve but the side invisible zipper prevented me from doing this. In the end I could have skipped the zipper as my body shape does not need it. I received a free Celeste Dress pattern from Itch to Stitch in exchange for testing. This  pattern would be excellent for a beginner sewist wanting to try grading. It is a great all round pattern for beginner and beyond.


My hacked version of Itch to Stitch Celeste


After testing was over, I was free to diverge and make this my own. I started by shortening the dress to a tunic. I added a back yoke, mirroring the front. This allowed me to add a back pleats for added roominess and it visually breaks up the back of the tunic.  I color blocked the front yoke, the reversed pocket facings, and replaced the sleeves with the sleeves from Anna Allen’s Anthea pattern. Warning the Anna Allen’s Anthea pattern does not offer extended sizes. So yeah, I bought the pattern for the sleeves, but I adore them. I have worn garments with these sleeves on hot humid days, and I get coverage, free range of motion, and airiness, which is rare with my 19”+ biceps.

Front of Anna Allen’s Anthea blouse. Limited sizing, but generous design ease.


I also dropped the arm scye down the side 1” and eliminated the zipper which is not needed for my pear shape frame.

The Celeste Dress pattern by Itch to Stitch is such a great launching off point. Imagine piping, embroidery, and trims just to name a few. I considered a band of print near the hem, on the sleeves, waist ties in contrast. There are so many possibilities. I highly recommend the Celeste Dress by Itch to Stitch patterns as your next launching off point.

Posted on Leave a comment

The Apron Dress on 3X Apple/Pear Shaped Me

Final Version – Front

Final Version – Back

So, I have been garment sewing out of necessity for a couple of years now. When I started I actually thought about the wardrobe I wanted but could never find or buy in Ready To Wear. One of the items I wanted was an apron. Back then there was no such thing as a cross over apron pattern for someone my size. And then, last week I stumbled on to the Apron Dress by The Assembly Line. I loved the look of it. It had simple yet flattering and thoughtful design lines, and it was offered in a size range, close enough to my measurements that I decided to give it a try. Full disclosure, I am a 48 inch bust, C cup, 48 inch waist, and 58 inch hip. This pattern offered only finished garment measurements in cm. The pattern is offered in a two versions: straight size and plus size.  With the 3X finishing at waist at 51 inches, I decided my first attempt would be a straight 3X. I examined the skirt pieces and drew a line at about hip distance around both. I then measured and it came in large enough to accommodate my hips with enough ease. I was not sure how to go about grading this bottom skirt portion with its unique slanted side seams. I imagine a cut and slash method might work, but I was glad to not have to try it. The bib was going to be big for the first go around, but I was willing to accept that for my first attempt.

This was my first time working with a pattern from The Assembly Line. I bought the PDF and printed it out on A0 paper. The pattern offers multiple sizes, but all sizes are rendered in same solid black line. The lines are not marked near the intersections which caused me some confusion. A silly mistake for an experienced sewer, but a new sewer could be easily confused. I did end up cutting the bib section too large, but luckily I was able to discover my error and just trim down the original piece. Phew! I did do several things differently. It was a hassle but I did sandwich my front straps between bib and facing. I sewed the back straps intersecting diamond, to make it easier to get in and out of. I turned the single back pleat into two opposing pleats. Another down side to the plus size version, is it mentions several options if the pleats proposed do not work, but there is very little guidance for how to determine correct placement. My first attempt I installed snaps as directed,  but since the straps were spaced so far apart the middle of back waist drooped in a very unattractive way. The waist was a bit large but the skirt was skimming my hips perfectly. I could not afford to go down a size. I did not want to move straps as their placement was part of the overall design line of the garment. I needed to find a way to cinch the waist and bring back straps closer together without causing problems for my hips. To save my first version, I added two more snaps to form two additional shallower pleats. This gave me the smaller waist I needed while maintaining the hip area. I decided on two opposing back pleats for my second version. I also reduced the width of the front bib by a total of 2 inches total to accommodate my bust. This required redrafting the facing and interfacing pattern pieces, which frankly was the absolutely worst part of this make. Something about paying money for a pattern and finding myself re-drafting multiple pieces makes me sad, but it was worth it.

How to determine your correct pleat depth if you choose two opposing pleats. Measure the distance between the straps on top of the back waist band (X). Then try on your dress and pin it to proper waist size, by pinching out some of the back skirt at center back. Do not over do it. Carefully sit with it pinned, to be sure you have left enough ease. Measure between the back straps again. Here is where math is your  friend.

X = Distance between back straps

Y = Desired distance between back straps (after pinning)

Z = X – Y

If doing two pleats, your pleat depth will be Z/4. If you are sticking with single pleat, your pleat depth will be Z/2.

The distance between my back straps was 21.5″. I wanted about 10.75″ between the back straps to prevent back waist droop and comfortable waist. This resulted in two opposing back pleats of 2 5/8″. It worked like a champ on my second attempt. When considering future versions I may replace the snaps with a short corset lacing  section to allow the garment to grow and shrink with my ever changing body.

I absolutely love my finished garment. It has been a long time since I have been so excited to wear a make. I love the fresh and interesting designs offered from The Assembly Line. My one caution is the pattern lacking proper labeling and differentiation between sizes. But, after that hurdle, the construction was straightforward and comprehensive. As for plus sizing, it will take some extra work on the part of the plus sized sewer to modify the pattern for different body shapes. A commercial pattern cannot possibly fit all possibilities. But for me a short, apple/pear shaped plus size, I managed to get a very flattering and well fitted garment. My next version is going to be in a light weight denim. This garment will work for multiple seasons. One could go wild with embellishing this garment as well. I just cannot say enough about it. Give it a try.

First Attempt – Front

First Attempt – Back

I am not affiliated with any of the following just a happy customer. The pattern is the Apron Dress from The Assembly Line. The fabric is cotton twill in blue and gray from Fabric Mart. The snaps are from KAM Snaps.

Posted on Leave a comment

Cape Crusader

Like many of us, I had to overcome many obstacles over the last couple of months in my non-sewing life to allow me to complete my version of Seamwork’s Camden cape. It is made with wool and linen, and black lining. It is a size 24. I am 5’4″. I added welt pockets, bound buttonhole, and a “romantic” hood from Simplicity 8470. The welt pockets came from following post, http://www.lindsayjaneane.com/seamwork-camden/. The bound buttonhole took much experimentation.

The original neckline left me wanting more. I experimented with several collars, all which came out awkward as the neck was quite large. I then experimented with several hoods. The smaller more traditional hood, looked like the nipple on top of a baby’s bottle. The larger more relaxed hood, described as romantic by a commenter on facebook post, softened the austere top of cape, and added balance to overall look. This cape has spiced up my winter outerwear. I highly recommend it.

Posted on 4 Comments

Jo and the Three Cashmerette Lenox Dresses

I started my first Lenox dress the day the pattern was released. I instantly fell in love with the waist definition and the lovely verticality of the front and back skirt pleats. The short sleeves were perfect for summertime while still offering coverage. The pockets were hidden yet functional. What was not to love? I am a short pear shaped woman, with C cup bust, 44 inch waist, and 54 inch hips. For my first attempt, I drafted a size 16 C cup top, onto a size 24 bottom. The sleeves were modified to be a bit longer and were a size 20 in front, and size 28 in back, to accommodate my large upper arms. It was a bit challenging, to alter the pattern without distorting the wonderful silhouette, but I got there, by distributing the added fullness throughout the bottom of the top pieces. I chose a directional mid weight cotton print for my first dress. Very soon, I was slipping into my first Lenox dress. Looking in the mirror it was love at first sight. I had found a way to show off my waist. Then, I sat down, and the love faded away. The waist was tight, and the buttons were strained. Not something I could wear out to dinner. I tried to think if I needed a standing only dress, and sadly the answer was no.

Undaunted, I quickly started on my second Lenox dress. This time I chose a mid weight linen. I measured my seated waist which was 3 inches larger, and re-drafted the pattern to accommodate the extra waist needed when seated. This resulted in a much more comfortable dress when seated, but the dress lost the lovely form fitting look when standing.

Discouraged, but not beaten, I was stumped until a gift certificate to my local fabric store arrived from my darling son. While shopping I came across a lightweight denim, with a bit of stretch, which soon became my third Lenox dress. To maintain some stretch in the waistband I used an interfacing made for stretch fabrics. I went back to my original drafted pattern, and success! The third dress had the tailored fit, and the stretch added the ease needed when seated.

A  few cautionary notes regarding the process follow. The first time cutting out the dress I unwisely ignored the cutting layout suggestions which resulted in me needing additional yardage to accommodate the long front button bands. Despite the detailed description in the pattern I sewed the button bands on backwards the first time. Using directional fabric, I also accidentally sewed the one of the arm bands on upside down. All these were easily fixed with a stitch ripper and some time. I added both length and girth to my sleeve as my upper arms required it. I added additional buttons as well, as I like the look, and being pear shaped, I do not need to undo the buttons, as the dress easily slips on and off over the head. I really love my Lenox dress. It helped me find my waistline, and it makes me feel absolutely wonderful while wearing it. I highly recommend Cashmerette’s Lenox dress pattern.

Posted on Leave a comment

Butterick 6466 Open Vest

View A

View B

I spotted a sewn sample of Butterick 6466 pattern at Sew Expo in Puyallup, Washington, at Coni Crawford’s booth. It was love at first sight. Coni Crawford herself, measured my high bust and suggested that I fell into XL size. Even with my 43 high bust, C cup, 45 waist, and 54 hips, I thought she was crazy. Even more crazy, I bought the pattern on the spot for $12.

This pattern appealed to me, because I live in turtlenecks and leggings most days. I hate being seen in that outfit, so every time I answer the door or head out for errands, I change.  I had long dreamed of a cover up that could be kept handy for quick changes. This vest seemed the perfect all season answer.

I did a muslin of the upper top in 1X. The arm holes were too small, so I carved out the 3X arms, from the 1X top. I then, cut and sewed up a test garment in  a wool and synthetic blend fabric. It was soft gray blue. It did not hold a press, which I thought would make it wrinkle resistant which is what I was looking for. It was on the thicker range of the suggested fabrics.

There are two views to this pattern. View A is described as circle skirt vest with pockets. View B has a more modern trendy shaping to the sides, with no pockets. I chose to start with View A, as it seemed less likely to fall out of fashion, and I love pockets. The pattern also called for a snap closure, which I replaced with three buttons, and button loops. I felt this would keep the upper vest in place.

I liked my first version of the vest, except for the bottom hem, which was undulating. There was 3.75 inch dip at side seams from the center front and center back hems. I am fussy about hems, and that seemed bizarre to me. I measured. Checked my work, and found that the pattern indeed, had a difference from center to side seams. The top of vest, had a slightly undulating bottom shape, which I thought would partner with the skirt to make the final bottom hem more consistent, but alas it was not to be. I ended up leveling out the front hem, and allowing the back hem to dip down. This resulted in an attractive enough look, but it left the front of the cover up vest, not covering up as much as I had hoped. The hips area has an incredible amount of ease, which easily accommodated my 2X/3X hips, even though the skirt was cut at 1X.

View A – Side View

I did email Coni’s Crawford website, and asked about the hem. I got a very nice if not puzzling response back. She said to make sure to measure the full bust when selecting a size, and that View A was a circular skirt which could fall out like that depending on fabric used. She also said they had liked View B much better. I did too, as that was what I had seen a sample of at the Sew Expo.

I suspected that my adjustments to the armhole of the pattern top may have inadvertently effected the pairing of top and bottom, causing the bottom hem to be distorted. I decided to make View B, but not to alter that pattern, so I made up a straight size 1X with the only alteration being, the enlarging of arm holes. I choose a cotton batik fabric. The results were very nice. I loved the hem of View B. I do miss the pockets. I like the longer length. Again the bottom was a 1X and it easily accommodates my 2X/3X hips.

View B – Back

Several cautionary notes: The some of pattern pieces are labeled 1, 1A, 2, 2A. The A pieces are for View B. That tripped me up. Also there is an error on step 13 of View B. You do not sew past the circle at the pivot point on side hem. I again exchanged emails with Coni Crawford who confirmed this. This pattern does add a bit of bulk at hips, which I normally avoid, but in this case, it added ease and shaping. Overall the pattern is fairly easy, and  I was able to make myself the garment that had caught my eye.

Posted on Leave a comment

Lagenlook Wardrobe Sew-A-Long

The Sew-A-Longs & Sewing Contests Facebook group has been a constant source of inspiration for me, for the past few months. In January I spent a month, drafting a pattern for a well fitted shirt from scratch. Although I have been reading, watching you tube videos, and taking Craftsy classes, the monthly sew-a-long offered in January was a must do for me. I love the deadline, and David Coffin, was hosting the event, giving feedback and expertise throughout the month. I ended up with a pretty nice shirt. Even more importantly, a pattern which fits me perfectly, and now I have the knowledge needed to transform it into many different items. It has been a very long time since I have had such an empowering and satisfying experience.

Next up for me is a four month long Sew-A-Long which consists of a themed wardrobe containing 8 pieces to be completed between February and May. Details can be found on the group’s Facebook page. So, three weeks in and I was still struggling to put together my game plan. And then it occurred to me, I do not want just a new wardrobe, I want a makeover. I am petite, plus size pear shaped 50+ gray haired old lady. I have never planned a wardrobe in my lifetime. Clothes shopping consisted of finding the correct combination of colors, textures, price, value, and ease of care. Fit was never great for me, so I gave up and tolerated what ready to wear had to offer. I settled for over-sized tops, to fit my over-sized waist, hips, and butt. Shapeless pants that never seem to find my waist, while clinging to my hips and thighs and pooling on the floor. They do not make a pair of pants, stretch or otherwise that does not need multiple adjustments just to make them wearable, forget about comfort and fit. Needless to say clothes and fashion were never an area that interested me, and to be honest it showed. David Coffin started his shirt sew-a-long posing the question; do you remember a favorite shirt? I did. It was a cream colored linen shirt. I loved how I felt when I wore it. It was retired when the kids came along due to its impracticality, and finally lost over the years, I remembered how it felt to look in my closet, and see that shirt, and slip it on, and wear it all day. It just made my day better. That is what I wanted for my new wardrobe. I wanted to open the closet door, and feel the excitement, and pleasure that comes with wearing something you truly treasure. No one manufactures these clothes. I cannot afford to have someone else design and make them for me.

So here goes, my Sew-A-Long Seasonal Wardrobe, is about bringing excitement and pleasure back to clothing for me. Again I turned to the internet to find the styles that I could get excited to wear. That is when I discovered Lagenlook. It is a German word, which means a layered look, and it has been a popular look in Europe for some time. To me it is both comfortable and stylish. Layering allows you to mix and match and be creative each time you go to put an outfit together. Now, I was truly getting excited. I still face challenges. My size and shape force me to give extra consideration when choosing items to avoid many common pitfalls. But for the first time, I thought I could open my closet and really like what I saw. What a way to start each day!


Here is what I decided to do for my eight pieces.
1. Structured pair of pants. I have narrowed this down to two patterns. Vogue 8499 by Marci Tilton. Will need considerable re-sizing. Second choice is Burda 7400. Using Linen.
2. Structured skirt – Vogue 8499 by Marci Tilton. Will need considerable re-sizing.
3. Jumper – Still looking for a pattern for this… I want inverted curved seam at bust heading down toward waist, then with hi lo hem mid-calf length. Loose and light so it is easy to layer.
4. Short Cardigan – Simplicity 2183 or McCall’s M6845
5. Boxy Short Jacket – Still choosing between Burda 8108 or Kathleen Chatham’s Jacket pattern found in Singer’s Perfect Plus book or A Little Something Jacket by CNT Pattern Co.
6. Long flowy vest – Choosing between three options: sleeveless version of my self-drafted shirt with, larger arm holes, or McCalls M6084, or Vogue V1375
7. Dress – Inverted rounded seam from breast to waist, shaped hem, or Hot Patterns 1179 Weekender Chameleon Dress
8. Tunic(s) – Multiple lengths – shaped hems. Style Arc Daisy Designer Tunic, Burda 6786,
Extra Credit
9. Short loose vest – wool or linen in McCall’s 2260


Will probably purchase Knit tee shirts for layering, Leggings, Scarves, Pair of shoes – flat, comfortable, all weather. I am not a feminine person in general. Hate make up, and frilly, or fancy stuff, but who knows before this is over I may even buy a necklace.