Posted on Leave a comment

2021 Sewing Bee – Round 2 – Recycled denim


When a round of the sewing bee is announced, I carefully read the announcement, all the while mentally scanning my list of things to sew. I have maintained a list of things I would like to sew for several decades. It started while I worked and raised my family. Back then sewing time was precious and very limited. It allowed me to hit the ground running when I did find time to sew. My list is not just a written list of projects – it consists of patterns, pictures of garments, swatches of fabrics, and notes on techniques. These are the seeds of my inspiration. When the sewing bee round is announced, I pull my ideas from my list and formulate a plan that incorporates the theme of the contest while also tackling as many “to sew” actions from my list. Now that I am retired, I pick away at my list pretty steadily. When I am participating in the sewing bee I go into warp speed. I try to incorporate as many of my sewing to dos as I can. Luckily inspiration is bountiful and my list of things to sew continues to grow faster than I can keep up with even during sewing bee.

Recycled denim was a bit of a challenge. I am an avid quilter, but quilted or patchwork clothing never appealed to me. The patchwork garments I made over the years never made it out of my closet. I admire the artistry of fashioning new garments from the pieces of clothing. But, I would not wear a Frankenstein garment that was obviously comprised of sections from other garments. Recycling is about minimizing waste, using resources efficiently, and repurposing. Making something I knew would never be worn was a non-starter. I finally settled on the Tuxedo blouse and a corseted belt. These two articles have been languishing on my list for far too long. Although I love sewing for family and friends, when it comes to the sewing bee, I could never ask someone to put up with the many try on sessions, so the garments would be for me. I immediately dug out two pairs of store bought stretch jeans in dark navy denim that I purchased just before lock-down. One of the pairs still had the tags on it. I had hoped the stretch would help to accommodate my unique physique, but it was not to be. A friend donated a beautiful faded light denim shirt. I went to a local thrift shop and purchased two more pairs of dark navy stretch jeans, and a denim skirt in a medium blue. These six garments would be the source for my projects. The Tuxedo blouse would be made from the four pairs of dark stretch jeans. The belt would be lighter in color adding more shape and contrast to the outfit, using both sides of the denim skirt. The beloved denim shirt from a friend would be used for lining in both pieces.

While formulating this plan, I took careful inventory of the fabric I had available. I did not cut the denim from the pants or skirt, until I could pin all the necessary pattern pieces on the denim. Some of the pieces had to be cut single layer, requiring extra attention to make sure I cut an up and down version of a pattern piece. This added a lot of stress to this project as I had very little margin for error. In some cases, I would sew test pieces out of other fabric to fine tune the fit, before the final pattern pieces were cut from the denim. On the back inside of the cuffs, you will find a dark spot of denim, which originally fell under the back pocket. I was so tight for dark denim I had no other choice for the cuffs. I think it adds authenticity to my recycling efforts. Also in the lower hem facing I was forced to use a piece of denim that originally had a pocket on it, and you can still make out the pocket outline. I am proud of how little was left of my original garments. I included a photo of the source garments before and after. Among the cast offs, there are useful sized pieces left destined for other projects, so I will have to find them a home.

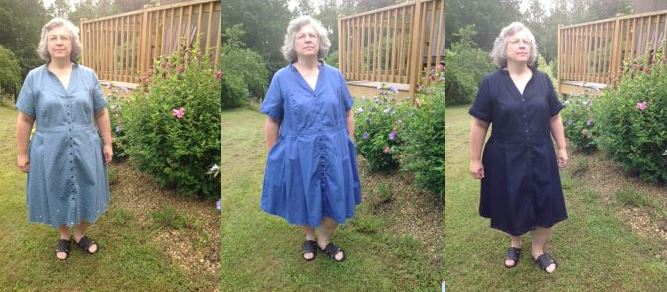
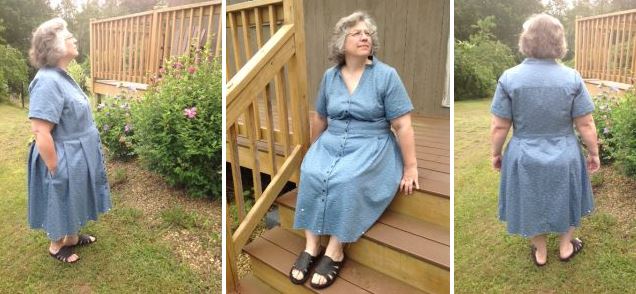
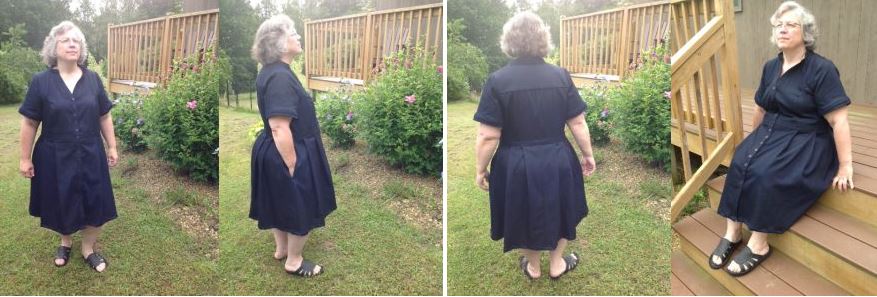
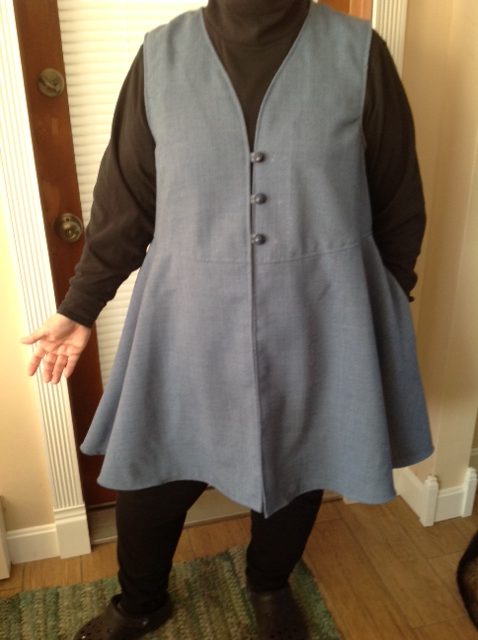
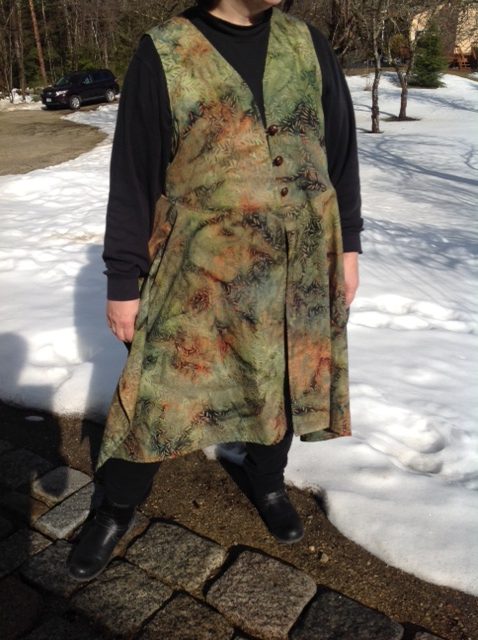
The Tuxedo blouse made it on to my list several years ago at a sewing class. A fellow student was wearing her creation and I kept staring at the design lines and searching for construction clues. I finally asked her about the pattern. It is the Tuxedo shirt from Sandra Betzina’s book, “No Time to Sew”. It is a winged collar blouse, with simple relaxed long sleeves with no cuffs, and the bottom hem line was like none I had seen before. It would flatter a variety of shapes and sizes. I bought the book, and the patterns. The reason this project lingered on my list was the pattern accommodated small, medium, and large. The largest hip measurement was 24” smaller than my hips. The bodice would also need grading, and the original pattern had no shaping in the way of darts or princess seams. Also, the pattern called for lighter fabric with more drape. But, I thought the denim would add structure to garment accenting its strong design lines and being more flattering to my figure.

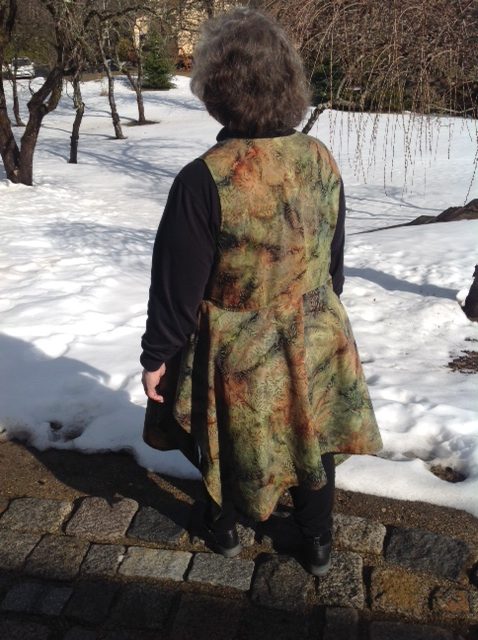
Not one to give up, I formulated a plan. I would use a self-drafted princess seam bodice, that I can fit easily, and I had already drafted a pattern for a flip cuff sleeve for the bodice. These had the benefit of using many smaller pieces which could be cut from the legs of jeans. I used the winged collar pattern piece from the original pattern, adjusting it to fit on my bodice’s neckline. For the bottom I had no existing patterns that would approximate the shape. I started from a circle skirt, reducing the flare to just skim my hips. In the original pattern there is not a waistline seam. The need to keep pattern pieces small forced me to add a waistline seam and to increase the number of panels in the peplum. To approximate the original pattern I wanted the peplum to flow smoothly from the waist. The bottom hemline was drafted as close as possible from the original pattern. Not being a fan of buttonholes in denim, I changed the front button placket on the original pattern to a cut-on hidden button placket that ended at the waist. This resulted in a garment with sharp crisp, clean, classic design lines, similar to the original pattern.

Once I had drafted the pattern, the construction was fairly straight forward. All seams were finished with a serged edge. I minimized topstitching to where it was needed and did it in matching thread to keep the look clean and sharp. I made covered buttons to maintain the design uniformity. The button loops on the cuffs are made using soft elastic covered with a two pass rolled edge done on my serger using matching thread. Gail Yellen has an excellent video demonstrating this technique. It results in a perfect matching elastic. Grading was extremely important to complete the collar and button stands. I recommend Muna and Board’s sew along for the Noice Jeans as my all-time favorite demonstration of how to grade denim. I used the lighter denim from the gifted shirt, to make the hem facing. The shirt was pretty stained and paint splattered, so I used the wrong side to get a more uniform look. The peplum consists of 10 panels, which was necessary to be able to cut them from the jean legs. When cutting, I managed to maintain grain-line on the top portion of garment. The sleeves had to be pieced. The bottom pieces had to be cut off grain, but the bias I think actually enhances the drape of the peplum. I absolutely love slipping this blouse on. The denim is soft with a slight stretch. The garment offers coverage without being oversized. I truly look forward to making another of these with ample fabric to allow combining some of the many pieces, so it is back on my “to sew” list. The blouse had the correct proportions for my body, and it would be perfect to showcase my accessory, a belt.

A corset was on my “to sew” list as well. I knew my first corset should not and could not be rushed, but a corseted belt would be an excellent way to familiarize myself with some of the techniques needed to someday make my own corset. View D from Simplicity pattern 8626 caught my eye, but I liked the back of it. Starting with that pattern I drafted a pattern which featured a front centered zipper to allow easier on/off. I added a laced section in the back. I added 4” to the pattern to accommodate my waist. Adding sections while reducing their size allowed me to add a lot more boning, which is installed in the seam allowances. The laced panel was designed to allow me to cinch the belt in or out up to 1.5 inches, which makes it versatile when pairing with lighter or bulkier outfits. The lacing is a thick cotton cording, and my husband saved the day by suggesting heat shrink tubing to seal the ends of laces to prevent fraying. The belt buckle was repurposed from a belt purchased at the thrift store. I also backed my sections with Peltex 70, ultra-firm stabilizer. It is 100% polyester and machine wash and tumble dry. This resulted in a very comfortable supportive belt. The amount of work to install a zipper, a belt buckle, 16 pieces of boning, 13 grommets, 2 rivets, throughout the 9 sections of the belt, has given me a new found appreciation for accessories, and I will never complain about the price of a well-made belt again. I used the denim skirt for the belt. I used the wrong side of the denim for the two front belt pieces to add a bit more contrast. I used the rest of the denim shirt to line the belt sections. I love this belt, and look forward to wearing it with many of my outfits. I could never purchase a belt that is this comfortable to wear while giving me the shape and support I want. I plan on making another of these too, which is why my “to sew” list never stops growing.

As for my list, here is some of the “new to me” techniques that I used during this project: making covered buttons, making matching elastic loops, drafting a cut on hidden button placket, installing grommets, lacing a corset, installing a belt buckle, shortening a metal separating zipper, and adding boning to a garment to name a few.

Once again, the sewing bee has done its magic, and in record time I have boldly challenged myself to draft and make a garment and an accessory for myself. Thank you to all those behind the scenes that make it possible, and thanks to my fellow participants who not only understand the joy and excitement of sewing bee mania, but who also inspire me with their creativity and willingness to share!


Posted on Leave a comment

2021 Sewing Bee – Round 1 – Uniquely you pajamas


I am a “nightgown or nothing” kind of gal, so two piece pajamas were a stretch for me. As I pondered my options my 7 month old German Shepherd puppy nuzzled my leg, and it came to me. At 58, I never thought I would adopt another dog, let alone a puppy. We lost our beloved Tilly several months into lock down and social distancing. The sheer silence and loneliness overwhelmed me. After much soul searching, I started to consider, plan, and train for the physical demands of a puppy. My latest love, Miss Lotte, came home October 7th. One thing I did not properly plan for was the many middle of the night and early morning trips outside. On more than one occasion, I surprised a delivery person, with me sitting on my steps in my nightgown. Those early morning moments spent sipping coffee, tossing sticks, kicking balls, and wandering the woods were so very special, but I could not help thinking I wish I had a more appropriate outfit. There is no time to waste when puppies have to go. I needed something that was comfy to sleep in, but would allow me to roll out of bed and be out the door in a flash. It needs to be warm, presentable and have pockets, lots of pockets. I searched the internet for a solution and stumbled upon Pajameralls, a combination of pajamas and overalls. As good as they were, they had some drawbacks, the buckles and hardware did not seem comfortable to sleep in, and would add unwanted excitement to my own middle of night bathroom trips, fumbling with buckles and buttons. So, out of this was born my version of Pajameralls.

I started with Jalie Pattern 972 Overalls. This pattern is unisex, and actually extended into my hips range. I made the following modifications: eliminating the front fly, replacing the side button and buckles with snaps, adding elastic to the straps for comfort. I added a contrasting internal cuff for added strength and pizazz. I compared the area between waist and crotch to my favorite fitting high waist-ed pants pattern, and made the necessary adjustments, which also required reworking the pocket pieces a bit. The effort was worth it as the initial fit was very close. At the same time I replaced the front fly with a simple center seam.

The next area of concern was re-designing the straps. I wanted to avoid the metal hardware, and needed fast on/off straps, that had to stay in place without being so strong that they dug into my shoulders and gave me my first wedgy in years. Much laughter accompanied this part of the project. The straps are two layers of fabric. There is a 3/4 inch elastic in a channel running down the straight side of the strap. The elastic caused a ruffle effect on the straps which I really liked.

I chose a Linen/Cotton blend fabric that is butter soft, lightweight, and breathable. For contrast, I chose a half yard piece of printed linen, which was actually one of the last pieces of fabric I bought before lock down. I loved the color and design, and I used every bit of that fabric in these overalls. The original pattern calls for a heavy weight fabric, so my choice meant I had to consider where I would need to add interfacing, stabilizers, and extra layers of fabric for reinforcement. This made the instructions a solid starting point, but I would have to determine where and when to apply the necessary interfacing, stabilizers, and extra layers of fabric. I added interfacing to pocket edges, twill tape to some seams on the bias, and doubled the fabric in the straps, as the original pattern called for a single layer of fabric. I also wanted to make sure I did not go too far, making a stiff garment which would not be comfortable to sleep in. I also added inside openings to the side of the front waistband, to allow the possibility of adding a drawstring or belt in the future should the need arise. Here is hoping that it does!

I decided on a 3-thread cover stitch for the top-stitching, using a thick 30 wt cotton thread for needle threads, and Poly Yarn in the chain looper, which is strong, soft, and more tolerant of heat. This results in a soft, clean, durable inside of the garment. Last Christmas I received a KAM snap setup for installing jeans buttons, grommets, rivets, and last but not least snaps. Never having used snaps before, I was delighted with how easy to install, attractive, and durable these size 24, fashion snaps in gun metal were.

For my second piece, I made my fitted for me T-shirt. Last spring, I took a two day online class with Deb Canham, in which she talked us through drafting and making a pretty near perfect fit t-shirt. We started with McCalls 6964 pattern, in a size closest to our bust size. She has great tips for applying the neckbands (both V and crew), fitting the sleeves, grading out, and just so much useful information. Even after years of sewing on serger and cover stitch machines I learned so much, and I live in my made for me T-shirts. For this outfit I wanted something more special that made me feel a bit more feminine. I used the Cashmerette write up for bishop sleeves and modified my long sleeve pattern to result in this pretty sleeve. The sleeve would drive me crazy if I were trying to cook, or sew, but it adds a bit of fancy when winding down at the end of a long day, and pulling on this t-shirt. The fabric is a very lightweight cotton knit. I am also very proud that no fabric was purchased for this project, so a considerable amount of stash busting has occurred.

Overall, (get it) I am delighted with the outcome, and look forward to rolling out of bed, and quietly stealing off with Miss Lotte in the early morning hours to share our quiet times before the world gets going.


Posted on Leave a comment

Jeans Finally!

I have been trying to make myself a comfortable pair of jeans for literally years. Full disclosure, making well fitting pants are hard. For a plus size person there are added hurdles. I started with the Sure Fit Design method. I learned so much from this system. I made custom blouses, gorgeous dresses, and a few pants with some success but only after I accepted an elastic waistband. The front was achievable, but the back of pants were always off with various wrinkles. With every alteration I seem to move the wrinkles but not eliminate them.

I tried some other plus patterns. Having some success with other Megan Nielsen patterns, I tried the Curvy Dawn. I could not even get the toile up my legs. After opening the legs up, the back was a mess, discouraged I gave up. After a long while I discovered Muna and Broad patterns. These patterns are all about the plus size body. I made their Waikerie Shirt and fell in love. Cute lines, and the short sleeves were stylish and just enough coverage  to hide my upper biceps, and still short enough to be cool in the heat of summer. I am not a fan of wide leg pants. Being rather short, they just never felt quite right for me personally, so I have not tried Muna and Broad’s other pant patterns. But when they recently released the Noice Jeans pattern, I had to make it.

I am 5’4″ tall with 48″ waist and 59″ hips. I made a toile out of heavy satin cotton, typically used as drapery lining. It had similar enough thickness and drape I thought it would be good practice for construction methods as well as a test for identifying necessary fitting alterations. I used size G for waist, and graded to H for hips. This required some minor alterations to the pocket pieces at the sides, to match my grading. I stumbled a bit making my toile from the written instructions, but I got there. Then I discovered that Muna and Broad provides a Resources button on the Noice Jeans pattern page which is a list of videos demonstrating the construction process. Suddenly, I was cruising along. The videos demo proper grading with heavy fabrics, zipper installation, and a Hong Kong finish on the waistband which I love. My toile is completely wearable but even with the generous seam allowances which allow for alterations, my bottom crotch area was, as they say, a bit hungry. Easily fixed by adding to the back crotch curve and moving the back crotch point out a bit. Other than that, they were a complete hit.

Now, another full disclosure, the Noice Jeans are HIGH waisted. I mean high waisted. I wore my  toile and although I can see outfits that I would welcome the highness of waist, I decided to lower the front waist to match my forward tilting natural waistline. I removed 3 inches from the top of my front piece. That meant using a 6″ zipper instead of 9″. I had to redraw all pocket pieces, zipper pieces, and the front waistband. It was tricky work, but doable if you take your time.  I also made the necessary minor alterations to back crotch. I then made my first real pair of denim jeans for myself. It was a heavy non-stretch denim. The second round of construction went smoothly except for the buttonhole. The thickness of denim proved problematic for my automatic buttonhole foot even with a compression plate. I ended up making a fairly decent keyhole traditional buttonhole using the manual buttonhole procedure on my machine. But while cutting open the buttonhole, I sliced through the threads. Disaster! Quick video from internet on how to make hand buttonholes, and I was saved. I like the handmade buttonhole even better.

These jeans are comfortable when sitting and standing. I can comfortably bend over and touch the ground. There is some small gaping when I sit, but it is minor, and easily fixed with a belt. I may reduce back waist band a very small amount in the next make. And there will be more makes. In lovely high quality denim that I have been collecting and saving for the day when I had a denim jeans pattern that worked for my unique body shape.

I do not work for any pattern companies. I am simply putting this  information out there, to aid others who might be attempting to make their own custom plus size denim jeans. The secret to my success with Muna and Broad Noice jeans is due to the choice of two fits. One fit is a traditional curve from waist to hip, and the other fit is for folks who have a more boxy drop, as if there is a small shelf  on top of the hips. The resulting back yoke shape is much more dramatic and curvy than I had encountered on any other patterns. Once that area was properly fitted the lower back crotch curve can be adjusted with normal methods. This probably won’t work for everyone, but it was a game changer for me.

Some added details… I used a 90 jeans needle for both topstitching and regular sewing thread. I did a lot of practice on scraps of similar thicknesses before stitching. The topstitching thread I used was 30wt topstitching thread from Superior Threads. The topstitching was standard stitch with tension adjusted for thicker jeans fabric on 3.5 stitch length. My hardware came from KAMsnaps. The belt loops were a zigzag .75 length with 2.2 stitch width. I hammered down the bulk before all attempts to sew. This was on a Bernina 710. I also have a gravity fed steam iron. Hope that helps! Happy Sewing!

Posted on Leave a comment

2020 Sewing Bee – Round 4

I have always dreamed of traveling. In recent years, I have traveled to Scotland, Switzerland, Ireland, and did many car trips, including one to Florida, and another to Cape Breton, Nova Scotia in Canada. I toured Scotland with my daughter, who insisted I leave my suitcase home, and instead I traveled with a 30 lb backpack for 8 days. In Switzerland, I spent 10 days, hiking, doing walking tours, scrambling through a castle, hopping boats, horse-drawn wagons, and trains, and eating in fine restaurants, all requiring careful consideration of my wardrobe. My husband and I love road trips, and averaged at least one road trip a month last year. Having just completed a year packed full of travel, I learned a lot, about what I want to wear on my future adventures. Having a well tailored, comfortable, versatile, condensed, attractive wardrobe makes all the difference while traveling. As I travel more and more, I also want to find ways to pursue my obsession with sewing while on the road. I left for a road trip just two days after the round 4 challenge of the sewing bee was announced. The trip had been planned months ago, and I never thought I would make it to round 4. Never, say, never. Suddenly, I needed to pack up a streamlined sewing studio and hit the road. I formulated my plan, picked patterns, pulled fabrics from my stash, made a few purchases, and made up some quick muslins. I then cut all the garments, applied interfacings where needed, and I serged all the edges to keep the raveling to a minimum. There were a number of snags along the way, but, I adapted and overcame. I am so pleased with my outfit, but also for my successful proof of concept of sewing on the road. When my husband does eventually retire, I hope our future holds many more adventures on the road, but I worried that it would drastically cut into my sewing time. This outfit was the result of my first attempt at creating travel worthy garments using my portable, yet comprehensive sewing studio.

I present to you my traveling outfit. This is comprised of four pieces: a dress, a blouse, a pair of pants, and a short kimono jacket. The dress is a full length dress, with a rounded collar, tulip sleeves, inseam pockets, a button band with 17 buttons, and can easily be converted into a duster. The blouse is reversible, featuring a hi low split hem, delicate trim on neckline and armscye, and pintucking on one side. The pants are pull on linen pants with side in seam flat felled pockets, a very comfortable high waisted, wide triple elastic waistband, and cuffable pant legs for an impromptu walk on the beach. The jacket is a short reversible kimono jacket, made with denim and linen, featuring patch pockets and a bound buttonhole with back to back buttons for reversibility. This versatile comfortable attractive 4 piece ensemble can be mixed and matched for many different looks, making it perfect for traveling.

The dress is a self drafted pattern using my sloper created with the Sure Fit designs dress kit. The dress features princess seams, tulip sleeves, full length front cut on button placket, and a 3/4 circle skirt bottom. It is made with 6 yards of Robert Kaufman’s Brussels Washer Navy. The blend of linen and rayon has a lovely drape, that dances around my legs as I walk. It is long, cool, comfortable, and with an extra couple of buttons and buttonholes, it converts into a duster or long vest. This idea came to me when I found myself touring through a castle full of winding staircases in a lovely long dress. To safely navigate, I buttoned up the dress on itself, it looked strange, but it worked. This is a more attractive version, which can easily convert into several very flattering looks. I placed a button on the inside bottom of each button band. I also attached tabs with buttonholes along the back princess seams at the waistline. This allows two different levels of drape. I wanted to use flat felled seams but, this was not compatible with curvy princess seams so I devised a clean finish, that transitioned to a flat felled seam below the waist. The armscye seam allowances are bound with bias to keep it neat. The curve in collar mimics the curvy tulip sleeves. The tulip sleeves are large upper arm friendly, and add width to my narrow shoulders, balancing out my overall pear shape, and giving the impression of more of an hour glass shape. I feel absolutely fabulous in this dress.

The top is a reversible pull over top. The white side is pintucked. The neckline and armscye is trimmed with a white flat piping. The bottom is finished with a hi-lo split hem. It is made with white handkerchief weight linen, and a lightweight printed linen. It is cool, comfortable, and provides two looks with one garment. The pattern is self drafted from my sloper. It is dartless. I challenged myself to find a way to make it reversible. I had these lovely yet sheer linen, that I would not use alone, but together in reversible top was perfect. The pintucking was done on my serger, and gives the garment a little structure. The construction was tricky to figure out and was achieved in a hotel room late at night with a couple of scraps of cotton, resulting in a mini mockup. The shoulder seams are sewn on both tops. I sewed a bias strip folded in half around neckline of one top. I then layered tops right sides together, and used the first stitching as guide to stitch neckline on both shirts. The flat piping made it very easy to turn the shirt. The armscye’ s were done similarly, but the trim must not fall within seam allowances. I used burrito method the sew the arm scye’s right sides together after trim was applied. I then sewed the side seams down to the start of the split hem. I used the burrito method once again to finish the front hem. I left a gap in the back hem to allow for turning right sides out. I also cut the white side of shirt an additional half an inch longer in the front resulting in a thin white edge on the front lower hems of both shirts to coordinate with the other trim. I skipped white trim on back hem for practicality. I will repeat this pattern again, but next time I want to try using some, lovely lawn print with some handkerchief weight linen for an even lighter more fluid effect.

The pants were from a tried and true pattern. Being a short plus size pear shaped woman, makes making pants for myself a major endeavor. All pants patterns require extensive alterations to fit me comfortably while sitting, standing, and walking. I have a tilted waist and wacky crotch depth and crotch curves. Many muslins were done, and with every make I tweak and enhance the fit and finish of this pattern. I love these pants, which are as comfortable as my knit leggings, but are much more flattering. This pair of pants is made in a heavy weight linen. The seams are flat felled, with side in-seam pockets. The triple elastic waistband is wide, comfortable, and attractive. I added an additional 1/8 inch of top stitching along the very top edge of the waistband, which adds a bit of polish. I added linings to the lower legs to allow cuffing, and to provide a pop of color and coordination with other pieces in my travel wardrobe. I also eliminated the front waist pleats, and added back waist darts to my version of the pattern for a better fit. The pattern is a free PDF download from “Fabric-stores.com”, and is called the Crisp Linen Pants Pattern. The pattern accommodates sizes 0/2 to 28/30, in Letter/A4 paper. The instructions are provided via an online tutorial, with separate links for detailed instructions on several techniques such as flat-felled seams, and putting a pocket in a flat felled seam. There are no licensing restrictions as well. These pants are perfect for the impromptu walk on the beach, as well as throwing on some heels and heading to dinner.

The jacket is the Women’s Kimono Jacket sewing pattern, from Wiksten. Although the pattern only extends to XL, it is a loose boxy style, which I thought could work well for my plus size figure, with some adjustments. I chose the short jacket version, but shortened it an additional 2 inches. I shortened the sleeves an inch, as well. I also added a rounded triangle to the back of the collar piece to expand the flip down collar on the jacket, which could then conceal the collar on the dress, avoiding the double collar conundrum. I am not a fan of open jackets, so I also added a bound button hole and two back to back buttons. Being reversible, it offers two looks, in one garment. One side is a denim I purchased from Vogue fabric, several years ago. The second side is Robert Kaufman’s Brussels Washer YD denim, purchased from Pintuck & Purl, an amazing shop in North Hampton, NH. This jacket feels so lush. I typically shy away from loose boxy styles, but with a few minor adjustments, this jacket broadens out my shoulders, balances out my pear shaped figure, and draws the attention up to my face and upper body.

Round 4 started in snowy cold New Hampshire. I cut all of my garments out, and then packed up a mini sewing studio and headed south for warmer climates. Not long into the drive, I discovered I had cut the dress for a scoop neck, instead of a collared neckline. I re-cut those pieces on a king size bed in a Hampton Inn. Thank goodness for my emergency backup supply of fabric. During the 2.5 day drive, I basted seams, planned construction, started my review, and fretted about how I was going to get it all done. Once in Florida, I setup in the sunny game room, complete with a ping pong table, which worked beautifully as my sewing studio away from home. Now that the sewing is done, I am packing up the traveling sewing studio, unloading my bike, and I am heading out to catch up on some much needed sunshine, fresh air, and exercise, confident that I can bring my sewing along on my future travels, with planning and preparation.

Why should I win the sewing bee? Like my fellow contestants, I love to sew. For me sewing is the perfect combination of mathematics, engineering, and artistry. Sewing is a constant source of challenge, frustration, and provides a true sense of accomplishment. When I sew, my focus and concentration takes me to another world. Sewing for me started with quilting, which I did for nearly 20 years, and then one day I stopped. I had had enough of quilting. Soon after, my daughter needed a prom dress, so I bought a book on couture, dusted off my sewing machine, and made her a gorgeous gown, in satin, with boning, and tulle. It took several months, and for my first muslin, I used actual muslin, which makes me laugh today. After the prom dress, I decided I would like to make myself a vest. How hard could that be? I bought a pattern, measured, sewed, and it looked beautiful until I put it on. It was even worse, when I sat down. Adjustments were needed. I bought a book on plus sizing fitting, and my next vest worked up much better. There are no magic patterns that work for me out of the envelope. I have studied and learned how to alter patterns for my plus size body. The next hurdle was to learn how to choose a fabric, and consider drape, durability, as well as visual impact. In the early days, there were too stiff skirts, unintended see thru tops, unfortunate pattern placements, and casualties that did not survive the washing machine. After all that, I was starting to make some really nice garments, but I found they did not always flatter my figure. So I then studied my proportions, and my shape, and how to pick patterns, fabrics, and styles that would balance out my figure. Suddenly, the success rate of my garment making soared. Today, I live in made by me clothes. I love making for me and friends and family. I love sharing my love of sewing. I would love to be able to go back to my curvy plus size online communities and say, I won the sewing bee, making and modeling my own perfectly plus garments. I think it would inspire a lot of others to navigate the labyrinth and come out the other side, to a place where you can make one of a kind garments, that make you feel absolutely fabulous.

Finally, a huge thank you to the Pattern Review team, and the guest judges. I appreciate the time of effort that went into making this event a reality. It has been a real game changer for me. Also, none of this would have been possible without my amazing husband who made countless meals, rubbed sore shoulders, hauled sewing machines and totes full of fabric and sewing supplies, and took the most wonderful photos.


Posted on Leave a comment

2020 Sewing Bee Round 3 – Activewear

My outfit was made for bicycling. About five years ago on Mother’s Day weekend, I injured my knee. Actually, my knee without warning simply disintegrated a bit. I had been very active, loving hiking and kayaking in the summer, and skiing and snowshoeing in the winter. Several times a day I walked my two German Shepherds. I sat with my knee elevated and covered in ice packs, staring at my brand new hiking poles that I had just received for Mother’s Day and cried. After consulting with doctors I was given three options: surgery, drug treatment, or physical therapy. I choose physical therapy. My therapist and I together got me moving again. As part of my recovery plan, my therapist suggested bicycling. I scoffed at the idea at first. But, after a couple of timid attempts I was hooked. I fell in love with bicycling. How many times do you find something that is both good and good for you!

Being a short plus size woman, I can tell you my options for ready to wear (RTW) active wear were non existent. I did a lot of “man-me-downs”, men’s RTW clothing adjusted to fit me. For some reason men’s RTW active wear, was available in much better quality fabrics and a wider size range. Still I felt a bit frumpy in my cobbled together biking outfits. When biking 20+ miles a day, seam placement is critical. My husband and I bike as much as we can. A trail literally crosses over our driveway and is a mere 4 miles into our home town, which is a lovely summer resort town on a lake. I run into lots of folks I know, and often in summer, I can bicycle into town much faster than I could drive. I love to visit the shops and meet friends at the cafes. But, I did not relish the idea of walking around town in my bicycling outfit. So my goal for this challenge was to create a more chic bicycling outfit, one that would transition from biking to shopping.

My outfit has five elements. The main bicycling half zip shirt is color blocked with synthetic knits. The pants are wide leg leggings with a yoga style waist band, which have zips on the back of the legs converting them into bicycle friendly pants. I made a quick camisole as an added layer for under my shirt. I then made a vest which can be packed into my bike bag, and provides a much needed pocket for when I am off the bike. To top it off I found a sweet sheer remnant and I made a scarf to complement the look. This comfortable flattering outfit will let me bike into town without looking like I just biked into town.

The bicycling shirt is from the Jalie pattern 2682 – Women’s Top. It has a different neckline with a cut on collar, which is high in the back, and has a flattering v in the front. It requires four way 40% stretch, and has an optional front center zipper. Minimal seams around the neck, make this an excellent choice for biking. I have shorter than average shoulders, and with the cut on collar, the shoulder adjustments were tricky, but definitely doable. I also widened the waist and hip area a bit, and shortened the arms. The pattern offers so many possibilities for color blocking which I find very flattering. I love the look, and I will be making more of both the sleeveless and long sleeve versions, as soon as I can get my hands on some of the gorgeous active wear technical knits available today.

Click Here For my review of Jalie Pattern 2682

The pants were from Apostrophe Pattern’s MyFit leggings. You buy access to a program that generates a pattern according to the measurements you provide, the percentage of stretch in your knit, and the style options you choose. For this project, I chose the wide leg seamless version, with a yoga style waist band. The first pair fit well, definitely wearable, but for my final version, I added one inch to back upper thigh area, and I lowered the back waist an inch. Minor tweaks but they definitely smoothed the finished look a bit. These result in amazingly comfortable pants, with a snug high waist band, and flattering wide legs with no outer seams. I sewed some “Fantastic Elastic” into top of the waist band for added snug fit. I used the technique I found in the book, “Knits for Real People” by Susan Neall and Pati Palmer. I hate the look of my legs in tight leggings, but I love leggings. I only wear tight leggings out of the house when biking. While much more flattering wide leg pants on a bike could be troublesome. I do not want my pant legs to get caught in the gears, so I added a v shaped zippered gusset on the bottom backside of the wide leg. This allows me to bend over and zip and unzip the pant legs easily. No more searching for a changing room, and lugging a second outfit. I can convert the pants from biking to normal pants easily. When zipped the excess leg material is kept loosely to the back of my calf, which is comfortable when pedaling. The high waistband is excellent for also maintaining modesty when bicycling. I highly recommend Apostrophe Pattern’s MyFit leggings, I had made many options previously and the success rate is quite high. The key is getting your measurements right, and understanding and using stretch knits.

Click Here For my review of Apostrophe Pattern’s MyFit Leggings including my zippered gusset hack.

My third item is a linen vest. I wanted something to jazz up the outfit once I am in town. I chose to make a light lined linen vest. The vest has a side in-seam zippered pocket, which can not only hold my cell phone and a few essentials, but also contains an attached bag to allow me to stow the vest in before packing it into my bicycle pack, keeping it neat and tidy. The pattern is self drafted using my sloper from Sure Fit Designs system. I added a couple of welt pockets and some rouleau button loops, and my signature shoulder straps. This took the “biking” out of my outfit and added some polish.

I added a couple of other items to round out the outfit. I really liked the long front zipper on my shirt, which allows ventilation, but I decided a camisole would allow me to unzip and still maintain modesty. The camisole is a SUAT – Stitch Upon A Time’s Versa Cami pattern. I used fold over black elastic for straps. Layers are great on long bike trips and this used up the rest of my black knit. Win, win, win! I had all the knit fabric in my stash except one. Can you guess which one I bought for this project? The snakeskin print knit. I fell in love with the colorway and the texture, before noticing it was snakeskin. Not my first choice but due to time constraints I settled for this locally available knit fabric. While shopping for that knit, I also found a small remnant of sheer fabric, which screamed scarf. For the scarf I used my serger, and did a rolled edge, using water soluble stabilizer and wooly nylon in looper for better results.

This resulted in a polished looking outfit for romping around town in, which I can easily convert into a comfortable bicycle ready outfit for the 4 mile trip home. I will be making all of these items again, especially after I get some more pretty technical fabrics, that not only stretch but breathe, and wick moisture. I cannot wait! But wait I will have to do, as you can see it is not quite biking season here. 33 days until spring. It was a sunny 16 degree (Fahrenheit) day, while taking the photos. I took my hat off for most photos, but there is one included for fans of my favorite hat. Thanks to my dearest for his support and photography help, and to all for looking and sharing.

Posted on Leave a comment

2020 Sewing Bee Round 2 – Pockets!

Round two!


This is my second Seamwork Audrey denim jacket. I adored the first one, but I longed for a second version, a bit lighter, with some fine fit tuning, and of course, more pockets. The first jacket was done in a heavy denim and had a shocking lack of pockets, which only became apparent after the first few outings. The pockets theme of this contest jump-started my project: Seamwork Audrey Jacket – Round 2.

I love the design lines of the Audrey. It features two generous welt pockets, which fall out of sight on the side of jacket, and can hold quite a bit. But, that was the only outside pocket provided. An informal pocket was formed on the inside of the jacket, by the welt pocket bag itself. There were two pocket flaps on the chest but no pockets beneath. While wearing the jacket I found that getting things in and out of the welt pocket was slightly awkward, especially my cell phone, which went to voice mail often before I could fish it out.

So for round two, I decided to add pockets underneath those pocket flaps. But, I wanted to honor the flattering slanted seam lines in the center front jacket. The area between those lines would not accommodate my cell phone. The solution was to make those pockets, bellow or gusset pockets, which needed to be trapezoidal instead of rectangular in order to follow the current seam lines. Next, I wanted a sealed or zippered pocket, for my emergency cash, my id, my credit card, and my keys. I did not want to worry about these falling out of the pockets. A small zippered pocket was added to the upper left sleeve, which was easy to access with my right hand. I kept the original welt pockets as they are perfect for slipping your hands into while walking on a brisk day, and holding a pair of gloves. I polished up the internal pocket by adding edging on to the internal welt pocket bag. This jacket would now have four different sets of pockets making it perfect for dashing out the door.

Two other changes were made. I add two shoulder straps. I have relatively short sloping shoulders. The shoulder straps added some visual height to my shoulders as well as providing a place to hook my purse’s shoulder strap on. No more purse slipping off my shoulder while shopping. With traditional sewn denim buttonholes white whisker threads would start to appear with wear. This is a real pet peeve of mine. I changed all THIRTEEN buttonholes into tiny double welt or bound buttonholes. This required some careful consideration during construction, as the front of the buttonholes were added prior to assembly, and then back of buttonholes were opened up after assembly. The welt pocket bag had to be altered as to not fall underneath several of the front buttonholes.

This jacket has 16 welts on it, 13 double welt buttonholes, a zippered welt pocket, and two single welt pockets. For each welt, I traced my welts on to the wrong side of fabric, and on to wrong side of interfaced welt fabric. I then hand basted stitches into the four corners of both welts. I would leave two tails, and then I would gently pull on both tails, causing the upper and lower welts to align perfectly every time. After the garment was assembled I carefully cut out the welt, in each buttonhole on the double Y’s, and used reverse hand applique, to finish off the back of the buttonholes. Time consuming but the results were worth it.

I chose a medium weight dark denim, with a tiny woven polka dot like flower pattern, which I have had in my stash for a couple of years. For top stitching I used a medium gray Aurafil 28wt cotton thread with 90 jeans needle. Finding 13 matching buttons was a challenge, as our local stores only offer a small selection of buttons, and rarely stock more than a dozen of each type. I started with my last drafted pattern version of Seamwork’s Audrey, but, shortened the sleeves, and brought the waist in by approximately four inches. The original pattern version had the following alterations: shortened the shoulder seam, added 4” to upper sleeve width, and graded, from 20 bust to 22 waist. I enjoyed following along with the online class video, in addition to their excellent written instructions.

I am incredibly happy with the outcome. This is exactly the jacket I had been visualizing in my head after my first Audrey denim jacket. The bound buttonholes were time consuming but I love the clean finished look. Drafting and sewing the trapezoidal gusset pocket took some experimentation but it fits my cell phone perfectly, providing quick access, so no more missed calls. I agonized over the drafting and placement of the shoulder straps, especially in relation to the dropped shoulder seams. Denim brings its own sets of challenges. I highly recommend jeans needles, and straight stitch plates. The top stitching was nerve wracking as I chose a high contrast between the thread and denim. Lots of practice on top stitching and welt making went on.

A couple of notes for next time: the side seams and underarms are sewn and then the edges of the seam allowances are finished separately. I would have finished the edges prior to sewing. The inside is tidy, and I understand the practicality for faux flat felled seams in denim, but I might be tempted to try real flat felled seams for making the inside as pretty as the outside. Of course, I would not recommend completing my next version in just under a week. I definitely recommend this pattern.

Posted on 2 Comments

2020 Sewing Bee – Have you got what it takes?

So… I absolutely love the Great British Sewing Bee. I fantasize about being a participant, always cool and calm under pressure. Well, the closest I got so far, is my very first entry into PatternReview.com’s  2020 Sewing Bee. In the Great British Sewing Bee, contestants have hours to complete a project. In the Pattern Review Sewing Bee, I had a week, to complete a collarless knit tee shirt with some connection to childhood. Easy, right? Well, not so easy. Of course, I waited a couple of days to even begin. Then, I decided to make a dart-less tee shirt, embellished with embroidery. I wanted to use my own original embroidery designs.  I already had a self drafted tunic pattern pattern with 3/4 length sleeves, which I had made several times in lighter weight knits. Some minor adjustments and I was golden. I also happened to have the  perfect fabric: an almost full bolt of gray medium to heavy weight knit.

2020 Sewing Bee - Round 1

So… step one, coming up with a design concept. The contest was taking place during the coldest and snowiest part of the year for me. I found myself, grumbling about the snow plowing, the snow shoveling, the icy paths, and frigid walks with my dog. To me a tee shirt is light and cool, worn in the summer, or possibly buried under layers for added warmth in the winter. Not exactly an opportunity to showcase my talent. I was thinking of my childhood, and spotted the neighbors out with their little one, pulling her along in her  sled, and it brought back a flood of childhood memories. I always loved winter, and snow. I loved skating, sledding, building snow forts, snowshoeing, and skiing. As a child, I loved that snowfall changed the landscape for me. Trees that were once too tall were now accessible, thanks to the new snow banks. Can you tell I was, well, still am a tom boy? I had my theme, snow.

Next, I decided to dust off my laptop and open up my design software and bang out a couple dozen snowflake designs. Easy, right? Well, not so easy. Of course, I installed my latest update, only to find that my laptop was not up to the task. Each step of the design took my poor old laptop forever. I spent a great deal of time watching the spinning ball, and wondering if I could muster enough patience to get through it. I managed to come up with 8 designs before I had reached the end of my patience. Excitedly, I grabbed my fabric, my tear away stabilizer, and powered up my new sewing machine. Yes, I had traded in my old sewing machine with embroidery capability, for a brand spanking new one. This would be my first time embroidering my new machine. Oh, and I had never embroidered on a knit fabric, only woven fabrics. So here are a few things I learned along the way. Remember to use ball point jersey needles on stretchy knits. Tear away is not appropriate for knit fabrics, use a cut away instead. And yes, cut away adds an extra time consuming step of having to trim away the excess while being careful not cut a hole in your beautifully embroidered fabric. When importing designs the stitch density must be considered and appropriate for your fabric and the stabilizer. Shrinking one of my original designs down too far, led to my first catastrophe, a knotted nest of thread under my stitch plate and a hole in my fabric. After clearing that mess, I started fresh, only to find my new machine throwing occasional top loops. Changing needles, re-threading, adjusting top tension did not improve things. I adjusted the bobbin tension on the bobbin case, but things went from bad to worse. It was the evening on a holiday weekend, and the embroidery was halted due to lack of dealer accessibility. When the dealer opened, I was there to pepper the staff with questions, and ended up purchasing a new bobbin case designed specifically for embroidery, and a multitude a stabilizers meant for use on knits. I cannot thank “little” Donna from Quilted Threads in Henniker, New Hampshire for all her help. Stop by this amazing shop if you are ever in the area, it is not to be missed. Equipped with proper materials, and some knowledge I forged on. Using my design software, I created a second set of my eight original designs only much smaller. This adjusted the stitch density accordingly and no more thread nests! It is recommended that a design be enlarged or reduced by no more than 20%. Also, my entire design was done in the same thread, so color changes were not necessary, but I did find it a good practice to occasionally re-thread the top thread anyway. Be sure to trim the starting tail, because if it is too long it will snag the design. I got through a perfect practice piece. I was ready to move on.

I washed and dried a 5 yard piece of a gorgeous gray medium to heavy weight knit, which I found on sale during a trip earlier this year to Fabric Mart, in Sinking Springs, Pennsylvania, another not to be missed spot . I am plus sized, but this knit was very wide, so I could make a long sleeve tee shirt with just 2 yards of it. It was a dream to mark, cut, embroider, and sew. Thank you sewing goddess for blessing me with this fabric, and a shout out to my husband who urged me to buy almost an entire bolt of it. I modified a pattern I had drafted for myself for a tunic with 3/4 length sleeves intended for lighter weight knit. I had made several of these successfully, resulting in a couple of my wardrobe favorites. I cut four rectangular over sized pieces each with the front, back and two sleeves marked on them. I hooped them up and embroidered the fabric, taking the placement into careful consideration. Being a pear shaped woman, I have learned that it is best to create interest that draws the eyes up to the face and chest area, and away from the waist and hips, so that resulted in the embroidery being only on the upper part of the garment. Maintain a good distance between edges in case adjustments are needed. I also used a tack for marking the bust apex, to avoid placing a snowflake on an apex, creating an unfortunate bulls eye effect.  I then embroidered the four pieces. While one was being embroidered, I used the time to carefully trim away the excess. I highly recommend slowing down your machine during embroidering. It really improves the results and reduces drama. I did have a few false starts, but I stopped and picked out stitches and started again. The fabric recovered beautifully. Trimming the stabilizer took a long time, and was very stressful, but I managed to get through it.

I contemplated just cutting out my pieces and sewing them up, but my sewing sense was nagging me. So, I cut a second top out of the extra fabric. I threaded my serger and cover stitch machines with the proper color threads and did some test runs. I sewed up the stunt double with no problems at all. I slipped it on, only to find that the thicker knit, had changed the drape of the garment. My shoulder seam was almost a full inch too far back, and there was noticeable wrinkles near the under arm  portion of the arm scye. Made adjustments to my pattern pieces by moving the shoulder seam, carving out a bit more of the arm scye, and deciding on the proper tee shirt and sleeve lengths. I retraced the new pattern pieces over the embroidered material. This is where leaving room near the seams is important so you have room to maneuver.  I cut the four pieces out and was ready  to sew.

Construction is straightforward. I serged the shoulder seams. I reinforce shoulder seams on tee shirts typically, but I could have skipped it with the thicker knit, I think. Next, I serged the sleeves on to each side. Some stretching was needed to make it align, but I find using little clips to place the seams, before moving to the serger, very helpful. The under arm and side seam were serged. I baste or thread tack the seam allowances into place before serging to insure proper placement during sewing, and avoid having pins anywhere near my serger blade. I also must stress the importance of pressing seams after each seam is sewn. It really does improve the overall look of the finished product. I flipped and ironed the bottom hem and cuffs, and then used my cover stitch machine to top stitch. Where seams meet, I cut a tiny bit into seam allowance by the fold, then flip seam allowances in opposite sides, this reduces the bulk. I use thread tacks to hold in place, and press it one more time. This preparation made the top stitching very smooth. My cover stitch machine comes with a clear curve foot, which is perfect for top stitching those tight curved areas. The final step was the neckband. I measured the neckline seam allowance, and reduced it by 20%. I cut a 1.5 inch bias binding strip from my knit, and sewed a mitered joint to give me the proper length band. The mitered join again reduces bulk. I pressed the neckband in half, with wrong sides together. I then used pins to mark four quarters of band starting with a pin near the join. I used 4 more pins to mark the four quarters of the garment neckline. This is done first by matching shoulder seams, then folding front and back, resulting in front and back centers on folds. Then match the front and back pins and find the two side centers, which do not necessarily fall on the shoulder seams. Making sure the join is in the back, I then matched up pins, and started clipping the stretched neck band to the garment, right sides together. I used my sewing machine set to knit stitch, and sewed the stretched neckband onto the garment with scant 1/4 inch seam. I pressed the neckband up. Pressing is important, once I was happy with the neckband, I used my cover stitch machine to top stitch. A clear foot, and going slowly, resulted in some fine looking top stitching around my neckband. One final press of the over all garment and I had a fine looking tee shirt.

I thought the hard part was over. But, then there was the photography. My incredibly understanding supportive husband snapped many photos, and listened patiently as I stressed over shadows and wrinkles. We had a good set of photos and called it a night. But the next morning we woke up to amazing sunshine, and we ended up taking another whole set photos during a morning walk with the dog, which was more fun and natural. The second set of photos were a huge improvement over the stiff posed shots taken the night before inside. Another lesson learned. Of course, that was not the final step. I had to create and publish a review of the project, and then officially enter it into the contest for judging. I will get the results in five days. Till then I will start cleaning the disaster area that was formerly my sewing room. I will also get reacquainted my husband and dog, my spin bike, and my kitchen. Because they were all ignored for the duration. My hat is off to anyone that participated on the Great British Sewing Bee. Perhaps it is a kindness that the challenges last only hours instead of days. I learned so much during this endeavor, and most of it had little to do with sewing.

Lessons learned:

  1. Make what you love. Make what will be worn. Do not compromise.
  2. Embroidery on knit, requires cut away stabilizer, jersey needles, practice, patience, and more practice and much more patience.
  3. Photography is a whole other art form.
  4. Writing a review is yet another whole other art form.
  5. A project will consume all the time available until the deadline.

My parting shot: I look pretty good even while I am wearing my puffy snow pants. Fingers crossed I make it to round two.

Posted on Leave a comment

Cape Crusader

Like many of us, I had to overcome many obstacles over the last couple of months in my non-sewing life to allow me to complete my version of Seamwork’s Camden cape. It is made with wool and linen, and black lining. It is a size 24. I am 5’4″. I added welt pockets, bound buttonhole, and a “romantic” hood from Simplicity 8470. The welt pockets came from following post, http://www.lindsayjaneane.com/seamwork-camden/. The bound buttonhole took much experimentation.

The original neckline left me wanting more. I experimented with several collars, all which came out awkward as the neck was quite large. I then experimented with several hoods. The smaller more traditional hood, looked like the nipple on top of a baby’s bottle. The larger more relaxed hood, described as romantic by a commenter on facebook post, softened the austere top of cape, and added balance to overall look. This cape has spiced up my winter outerwear. I highly recommend it.

Posted on 4 Comments

Jo and the Three Cashmerette Lenox Dresses

I started my first Lenox dress the day the pattern was released. I instantly fell in love with the waist definition and the lovely verticality of the front and back skirt pleats. The short sleeves were perfect for summertime while still offering coverage. The pockets were hidden yet functional. What was not to love? I am a short pear shaped woman, with C cup bust, 44 inch waist, and 54 inch hips. For my first attempt, I drafted a size 16 C cup top, onto a size 24 bottom. The sleeves were modified to be a bit longer and were a size 20 in front, and size 28 in back, to accommodate my large upper arms. It was a bit challenging, to alter the pattern without distorting the wonderful silhouette, but I got there, by distributing the added fullness throughout the bottom of the top pieces. I chose a directional mid weight cotton print for my first dress. Very soon, I was slipping into my first Lenox dress. Looking in the mirror it was love at first sight. I had found a way to show off my waist. Then, I sat down, and the love faded away. The waist was tight, and the buttons were strained. Not something I could wear out to dinner. I tried to think if I needed a standing only dress, and sadly the answer was no.

Undaunted, I quickly started on my second Lenox dress. This time I chose a mid weight linen. I measured my seated waist which was 3 inches larger, and re-drafted the pattern to accommodate the extra waist needed when seated. This resulted in a much more comfortable dress when seated, but the dress lost the lovely form fitting look when standing.

Discouraged, but not beaten, I was stumped until a gift certificate to my local fabric store arrived from my darling son. While shopping I came across a lightweight denim, with a bit of stretch, which soon became my third Lenox dress. To maintain some stretch in the waistband I used an interfacing made for stretch fabrics. I went back to my original drafted pattern, and success! The third dress had the tailored fit, and the stretch added the ease needed when seated.

A  few cautionary notes regarding the process follow. The first time cutting out the dress I unwisely ignored the cutting layout suggestions which resulted in me needing additional yardage to accommodate the long front button bands. Despite the detailed description in the pattern I sewed the button bands on backwards the first time. Using directional fabric, I also accidentally sewed the one of the arm bands on upside down. All these were easily fixed with a stitch ripper and some time. I added both length and girth to my sleeve as my upper arms required it. I added additional buttons as well, as I like the look, and being pear shaped, I do not need to undo the buttons, as the dress easily slips on and off over the head. I really love my Lenox dress. It helped me find my waistline, and it makes me feel absolutely wonderful while wearing it. I highly recommend Cashmerette’s Lenox dress pattern.

Posted on Leave a comment

Butterick 6466 Open Vest

View A

View B

I spotted a sewn sample of Butterick 6466 pattern at Sew Expo in Puyallup, Washington, at Coni Crawford’s booth. It was love at first sight. Coni Crawford herself, measured my high bust and suggested that I fell into XL size. Even with my 43 high bust, C cup, 45 waist, and 54 hips, I thought she was crazy. Even more crazy, I bought the pattern on the spot for $12.

This pattern appealed to me, because I live in turtlenecks and leggings most days. I hate being seen in that outfit, so every time I answer the door or head out for errands, I change.  I had long dreamed of a cover up that could be kept handy for quick changes. This vest seemed the perfect all season answer.

I did a muslin of the upper top in 1X. The arm holes were too small, so I carved out the 3X arms, from the 1X top. I then, cut and sewed up a test garment in  a wool and synthetic blend fabric. It was soft gray blue. It did not hold a press, which I thought would make it wrinkle resistant which is what I was looking for. It was on the thicker range of the suggested fabrics.

There are two views to this pattern. View A is described as circle skirt vest with pockets. View B has a more modern trendy shaping to the sides, with no pockets. I chose to start with View A, as it seemed less likely to fall out of fashion, and I love pockets. The pattern also called for a snap closure, which I replaced with three buttons, and button loops. I felt this would keep the upper vest in place.

I liked my first version of the vest, except for the bottom hem, which was undulating. There was 3.75 inch dip at side seams from the center front and center back hems. I am fussy about hems, and that seemed bizarre to me. I measured. Checked my work, and found that the pattern indeed, had a difference from center to side seams. The top of vest, had a slightly undulating bottom shape, which I thought would partner with the skirt to make the final bottom hem more consistent, but alas it was not to be. I ended up leveling out the front hem, and allowing the back hem to dip down. This resulted in an attractive enough look, but it left the front of the cover up vest, not covering up as much as I had hoped. The hips area has an incredible amount of ease, which easily accommodated my 2X/3X hips, even though the skirt was cut at 1X.

View A – Side View

I did email Coni’s Crawford website, and asked about the hem. I got a very nice if not puzzling response back. She said to make sure to measure the full bust when selecting a size, and that View A was a circular skirt which could fall out like that depending on fabric used. She also said they had liked View B much better. I did too, as that was what I had seen a sample of at the Sew Expo.

I suspected that my adjustments to the armhole of the pattern top may have inadvertently effected the pairing of top and bottom, causing the bottom hem to be distorted. I decided to make View B, but not to alter that pattern, so I made up a straight size 1X with the only alteration being, the enlarging of arm holes. I choose a cotton batik fabric. The results were very nice. I loved the hem of View B. I do miss the pockets. I like the longer length. Again the bottom was a 1X and it easily accommodates my 2X/3X hips.

View B – Back

Several cautionary notes: The some of pattern pieces are labeled 1, 1A, 2, 2A. The A pieces are for View B. That tripped me up. Also there is an error on step 13 of View B. You do not sew past the circle at the pivot point on side hem. I again exchanged emails with Coni Crawford who confirmed this. This pattern does add a bit of bulk at hips, which I normally avoid, but in this case, it added ease and shaping. Overall the pattern is fairly easy, and  I was able to make myself the garment that had caught my eye.